Creating a new Oracle Database using an Array Snapshot
Over the past few months I've worked with a number of customers who have been struggling to use array-based snapshots to create a copy of their Oracle database. The problem isn't the array side of things (which is generally as simple as a few mouse-clicks), but the Oracle side which requires steps like renaming ASM diskgroup(s) and the database, and recovering from the database being in a "crashed" state.
If you're using EMC Storage, then the easiest solution is often just to use AppSync, but there will be situations where you may want to do it manually.
The steps below cover what's required in most environments to handle creating a fully working copy database, with a new database name/SID and a new ASM diskgroup name to the original. If you're using a filesystem rather than ASM the steps are similar, but you'll need to replace the ASM steps with the relevant steps to rename/mount the filesystem/volume manager groups.
1. Take a snapshot on the array and present it to the host.
The exact steps for doing this will depend on the array, but what's critical is that you take a "crash consistent" snapshot/clone of the volumes, which enforces that all of the volumes are snapshot at the exact same point in time. If you're using multiple ASM diskgroups for the same database, then the snapshot of all devices in all diskgroups need to be taken at the same time.
2. Checking you can see the disks
Although technically not needed, it's a good idea to check that the disks have been correctly presented to the host. The best way to do this will depend on the environment, but for this example I'm using VMware with RDMs, so a simple "lsscsi" will show them. You can also use the "asmcmd lsdg --discovery" command to confirm that ASM can read the headers correctly - note how it shows the disgroup as "UNMOUNTED".

(Make sure you use the --discovery option - without it dismounted diskgroups are not displayed)
3. Rename the ASM diskgroup
Technically you can keep the ASM diskgroup name the same, as long as the host you're presenting the copy to doesn't already have a diskgroup with that name. However doing so may cause confusion as to which diskgroup is which, and will also limit you to a maximum of one copy of the diskgroup (and thus database) on the target host - so renaming is a good idea.
Grid includes a command to handle the hard work for us here - renamedg. In general you can just pass the old and new diskgroup names (dgname= and newdgname= respectively) to renamedg, however it also allows specifying an asm_diskstring which can be used to specify which disks the diskgroup being renamed resides on. This is especially useful if you have a conflicting diskgroup on the host, such as another diskgroup with the same name as the old name of the diskgroup you're trying to rename (in our example, DATA)
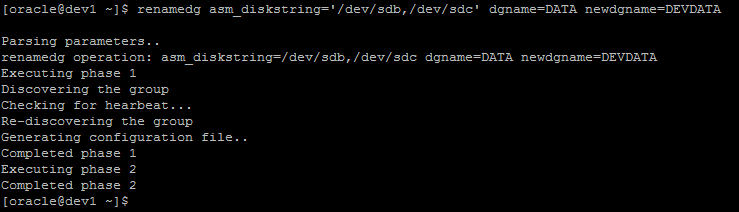
You can also add a “check=true” option which will tell you what it’s going to do, but not actually do it. Once you’ve confirmed it’s found the right disks, re-run the same command without that option to actually do the rename.
You can confirm the rename worked by once again running asmcmd lsdg with the --discovery option and confirming that the new diskgroup name is shown :

Obviously if you're using multiple ASM diskgroups for the same database (eg, one for data, one for redo) then you'll need to repeat the steps above for each of them.
(Note: If you're scripting this, it's a good idea not to use disk devices like /dev/sdX like I've done above, as these can change on a reboot. Instead use udev to give the devices a fixed name based on something like the WWN/NAA that will remain constant over a reboot, and then use these devices in the renamedg command)
4. Mount the new diskgroup
After the diskgroup has been renamed, the next step is to mount it. This is done as per mounting any diskgroup using the "alter diskgroup DGNAME mount;" command (or if you'd prefer "asmcmd mount DGNAME")

5. Creating a pfile
Before we can do anything at the database level we will need a pfile for the database. The easiest way to get this is to just copy it from the source host - either directly if you're using a pfile, or by creating a new one from the spfile - and then copying it to the new host in a temporary location (eg, /tmp/pfile)
There's two main areas that need to be modified in the pfile - firstly any file locations will need to be changed to reference the new diskgroup name. This will include at least the control_files location, but will also include anything else in the pfile that references the old diskgroup name.
We also want to add (or modify) an entry for the db_unique_name, and set it to the new name that we're going to rename the database to. If the old database name is unique on the host we're working on then technically we can get away without doing this - but it's a good idea regardless and will avoid any potential of us accidentally connecting to the wrong SID.
eg, we would change from


At this stage the db_name has to remain the same as the production database (so it matches the control file) - we will change it after we've actually had Oracle rename the database.
You may also want to change other settings in the pfile such as the SGA size/etc to suit the new server we're starting the database on.
6. Start the database in mount mode
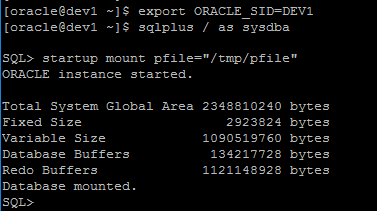
Set the ORACLE_SID to be the new (unique) database name that we've configured, and then start the database in mount mode, specifying the location of the temporary pfile that we're using.
7. Reconfigure the database to use the new diskgroup
The location of the datafiles can be updated to the new diskgroup using the "alter database rename file" command - but as there could potentially be hundreds or more of datafiles, logfiles, tempfiles, etc then this could be very tedious.
In order to help automate this, the file renamefiles.sql can be used to generate the list of SQL commands required to do the renames. Note that this script will NOT actually rename the files - it will just generate the SQL commands to do so, so you will then need to feed the output back into sqlplus to actually do the renames.

Note that the "no rows selected" at the end is because this database doesn't have any tempfiles configured. The renamefile.sql script looks for datafiles, logfiles and tempfiles - if you are using anything else that references a diskgroup (eg, FRA, archivelogs) then the relevant locations for these will also need to be changed.
Taking the output of this script and running it back through sqlplus will result in actually changing the location of the file references to the new locations. eg :
sqlplus -S / as sysdba @renamefile OLDDGNAME NEWDGNAME | sqlplus / as sysdba
Before going any further, be sure to check V$DATAFILE, V$LOGFILE and V$TEMPFILE to make sure that all references are to the new diskgroup – there should be none pointing to the old one.
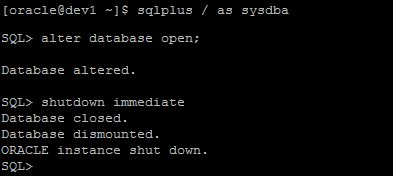
8. Open the database, then shut it down
Now that all of the file locations are correct, we can open the database and give Oracle a chance to start on the recovery. The database rename tool "nid" requires that the database has been shutdown cleanly before it is used, so we need to allow this recovery to occur before we can use it.
Once the database has been opened, you can shut it down again, which will leave it in a consistent state ready to be renamed.
9. Rename the database
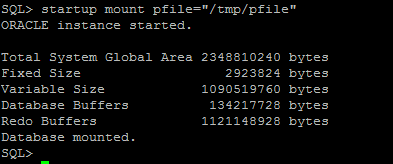
The Oracle "nid" (BD New ID) tool allows us to change the name of the database. In order for it to run, the database first needs to be up and running in mount mode. Given that we shutdown the database above to make sure it was consistent, restart it in mount mode, remembering to specify the location of the temporary pfile.
Then we can ues 'nid' to do the rename. Make sure that ORACLE_SID is set to the new name before doing this (or more correctly, to the db_unique_name set above). 'nid' requires 2 options - TARGET (the username/password - in our case just "/" for a local connection), and DBNAME (the new database name).
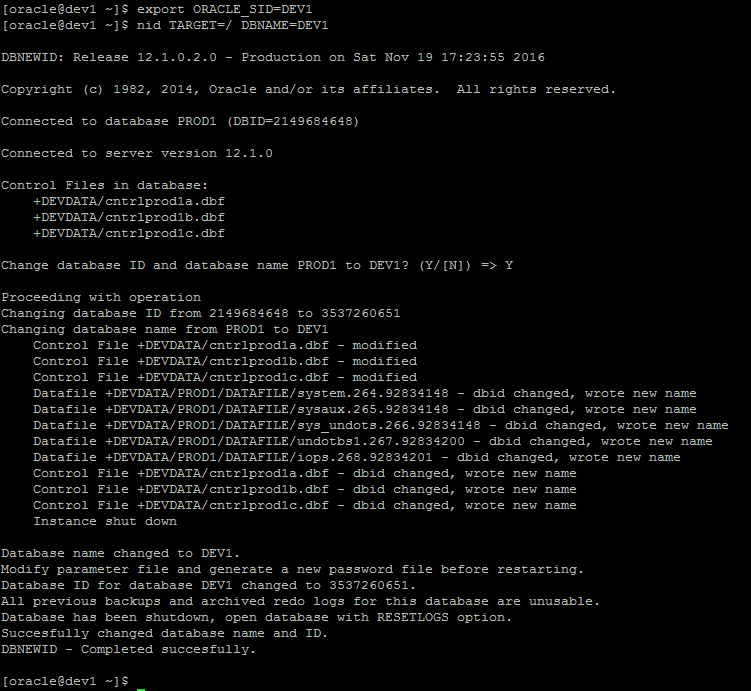
Note that ‘nid’ will shutdown the database as a part of the rename.
10. Modify the pfile
Now that the database is configured with it's new name, we need to change the db_name entry in the pfile to match, which also means that you can remove the db_unique_name entry if you want.

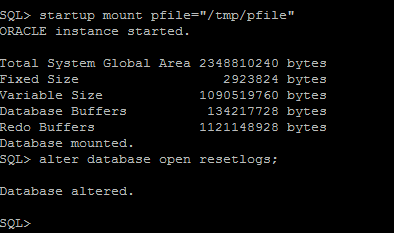
11. Start the database with "resetlogs"
"nid" requires the database to be opened for the first time using the resetlogs option, which will recreate all of the redo logs and reset their sequence to 1. Given that nid shuts down the database when it's finished, we need to first restart it in mount mode, and then alter it open using resetlogs.
12. Final cleanup
Final cleanup will depend on the environment, but the few things that spring to mind are :
- The pfile. Either copy it to the correct location, or presuming you use spfiles then copy it to an spfile.
- Renaming the control_files. If your control files include the name of your database then you may want to rename them to have the new database name.