XtremIO Snapshots and Veritas Volume Manager
It's been 20 years almost to the day since I started using Veritas Volume Manager, or Sun Enterprise Volume Manager (SEVM) as the re-branded version from Sun was called at the time. SEVM used to be included free with all Sun SPARCstorage Array 110 model arrays (an external proprietary fiber-connected JBOD array capable of supporting up to 30x 2Gbyte or 4Gbyte disks!)
The good news is that in almost 20 years, very little has changed, so when a customer asked me to do some testing with Veritas InfoScale (as it's now called) on XtremIO X2 it was amazingly easy to get things up and running - despite it being almost 10 years since I've used VXVM!
The specific purpose of the testing was to show refreshing of an XtremIO snapshot on a Linux (CentOS 7) host running VXVM. Before we do a refresh, we need to actually take the snapshot, and make it available on the host...
The Setup
To do this I setup a clean CentOS 7.4 host, installed Veritas InfoScale Enterprise Storage 7.3.1, and then presented 2 LUNs from an XtremIO array to the host. As I was using VMware, the LUNs were mapped to the host as RDMs.

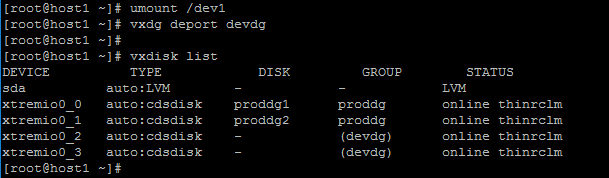
Using vxdiskadm I then added these disks to a new diskgroup ("proddg"), created a 200GB volume ("prodvol1") in that diskgroup, and mounted it up a new a new VXFS filesystem mounted under /prod1 :
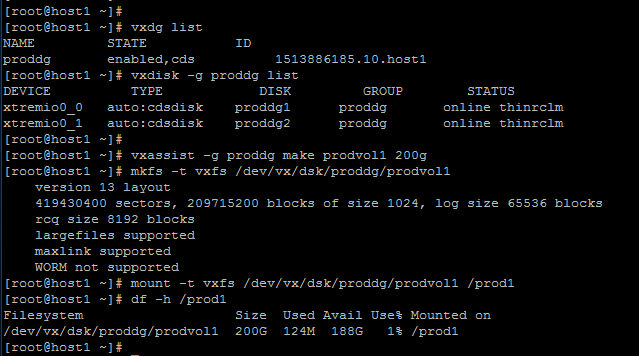
In order to track different copies, I created a file with the current time/date in this filesystems :

Taking the Snapshot
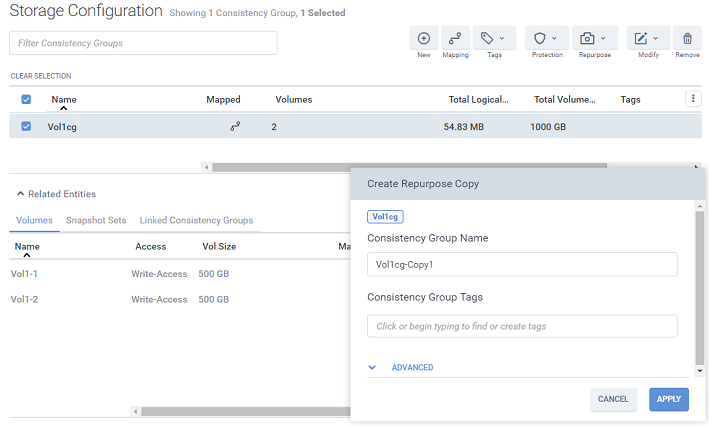
With all of that done, it's then back to the array to create the initial snapshot of these volumes. The initial 2 volumes were put in an XtremIO Consistency Group called "Vol1cg", which I then created a repurpose copy (ie, writable snapshot) of called "Vol1cg-copy1" :
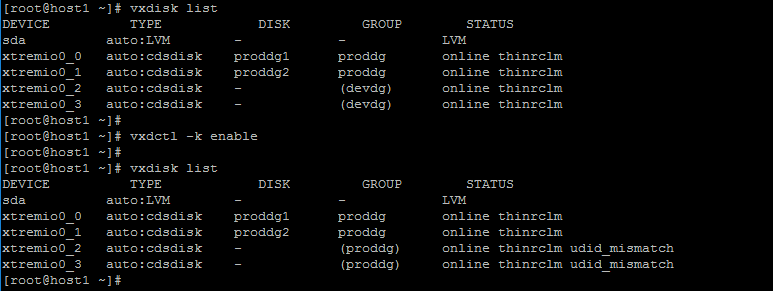
After presenting the new snapshot LUNs to the VMware host, I then mapped them to the same Linux guest as the original LUNs. This adds an extra complexity to the process, as the snapshot LUNs have the exact same VXVM signature on them as the primary LUN, so as far as VXVM is concerned they are the same disks.
Thankfully VXVM handles this cleanly, detecting that the serial number of the disk has changed, resulting in a "udid_mismatch". This is a good thing, as it causes VXVM to ignore those disks and not try and treat them as a part of the existing diskgroup.

(xtremio0_0 and _1 are the existing disks. xtremio0_2 and _3 are the snapshot LUNs)
If we had presented these snapshot LUNs to a different host, at this point we could have simply imported the diskgroup (optionally renaming it in the process) and started using it. However because we've got both the original and copy LUNs on the same host, we need to do an extra step to tell Veritas exactly which LUNs we're wanting to work on.
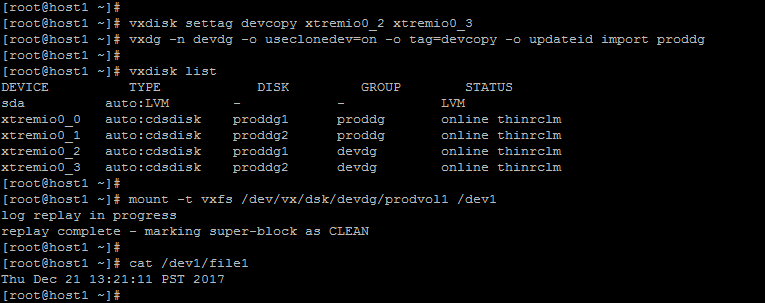
To do this, we add a "tag" to the LUNs that we want to operate on. The actual tag we use isn't important, as long as we're consistent - in this case I tagged the disks with "devcopy" :

Next we can import the copied diskgroup with a new important flags :
- -n devdg - The new name for the diskgroup (so we don't have two diskgroups with the same name)
- -o useclonedev=on - This is the magic flag that tells VXVM that we're importing a hardware-cloned LUN, and allows it to ignore a number of things that would otherwise be an issue (eg, the diskgroup marked as already being in use)
- -o tag=devcopy - Defines which copy of the disks we want to using - being those that we tagged with the "devcopy" tag above
- -o updateid - Tells VXVM to create new disk identifiers for the disks, so they no longer conflict with the originals.
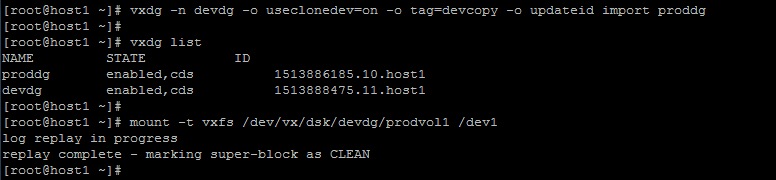
Note that when mounting the filesystem it did a journal replay - that's because the filesystem was still mounted when we took the snapshot. For non-vxfs filesystems extra steps like an fsck might be required.
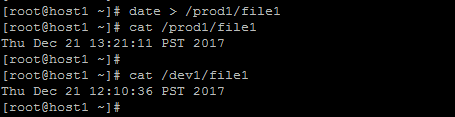
Finally we can check the file we created on the filesystem and confirm that it's an exact copy of the original :

By changing the file on the original volume we can confirm that it does NOT change on the copy - which is what we would expect given that it's a completely independent copy of the volume/diskgroup :
Refreshing the Snapshot
Refreshing the snapshot on the array is a simple, single-step process - but before we can do that we need to make sure the host is no longer using the volumes we're going to refresh. The refresh will change the data on these LUNs without the filesystem/volume managers knowledge, which will result in perceived data corruption of the copy if the host is still accessing it.
For VXVM/VXFS, that's just a matter of unmounting the filesystem and deporting the disk group. At that point "vxdisk list" will show the disks as being a part of the diskgroup, but with parentheses around the diskgroup name to show that it is not imported :
Refreshing the snapshot could be done via the XtremIO GUI, but it can also be easily done via the REST API - here we are refreshing the "Vol1cg-copy1" consistency group from the production "Vol1cg" CG :

Veritas does not continually scan LUNs for changes, which means that even after the refresh, vxdisk list shows the old data for the disk names - the same as we saw before the refresh occurred. In order to fix this, we need to tell VXVM to rescan the disks and re-read their private regions by running "vxdctl -f enable" :
At this stage we're at the same point we were above with the snapshot LUNs being an exact copy of the production LUNs, and thus having the same VXVM identifiers, so we can run through the exact same steps (tag, vxdg import, mount) as before to import them as a new diskgroup :
As you can see, the time in the file has change to the new one - showing that the contents of the LUNs were refresh!